Construction Procedures of Steel-Encasing Reinforcement
1. Base surface treatment
- Grind the base surface to remove the weathered, carbonized, rusty, and cracked parts for a solid layer.
- Flatten the base surface and remove dirt.
2. Bolt planting
- Check the existing bar arrangement in advance.
- According to the construction design, drill holes on the base surface using a percussion drill and make sure to avoid existing bars and not perforate them.
- The distance between the edges of steel plates and the drilled holes shall be 5-10mm. And the interval between two holes shall not exceed 300mm.
- Install full-thread screws.
3. Steel plate installation
- Cut the steel plates according to the actual size of the construction site.
- Steel plates should be perforated in line with the screws planted in the base layer.
- Steel plates should be de-rusted and roughened with a grinder or a wire brush machine, and the grinding pattern should be perpendicular to the force direction on the steel plates.
- Wipe the steel plates with absorbent cotton soaked with acetone.
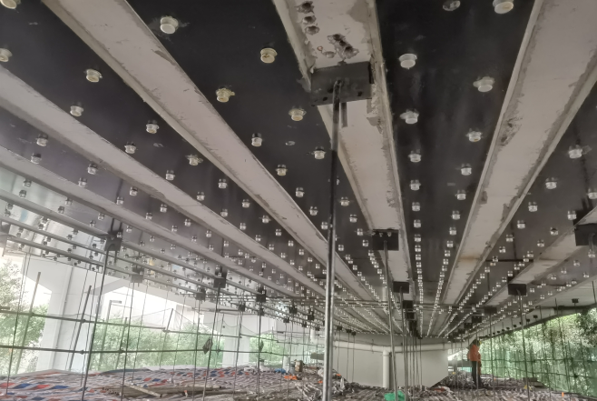
- Fix the steel plates on the bolts and leave a gap of more than 3mm between the base surface and the plates, to ensure a sufficient thickness of the adhesive layer.
- Weld the steel plate joints.
4. Sealing
- Attach injection nozzles and vent pipes to the edges of steel plates.
- Cover the bolt heads with aluminum caps.
- Seal the edges of steel plates with specialized sealant.
5. Preparation of adhesive
- Stir Component A and B of ASR-200 separately at a speed not exceeding 300 rpm.
- Mix the component at the ratio of A: B=3:1 (by weight) and stir at a speed not exceeding 300 rpm until the color is completely uniform.
- The container for the mixed adhesive should be large enough to dissipate heat. A high temperature would shorten the pot life of the adhesive.
- The adhesive should be consumed within a set amount of time to achieve satisfying bonding performances. So do not mix in a large amount at a time. Instead, prepare a small amount each time along with the construction process. The remaining materials shall be sealed well after the adhesive is taken.
6. Injection
- Inject the adhesive from the injection nozzles into the gap between the steel plate and the concrete surface with a pressure of 0.2-0.4MPa by grouting equipment.
- For inclined or vertical steel plates, the injection should start from the low nozzles.
- The injection should not be too fast to prevent the formation of air pockets.
- Tap the steel plates with a rubber mallet during the injection process, to check out if the gap is filled.
- When the adhesive has flown out from all the vent pipes, seal the vent pipes and maintain a lower pressure for about 10min.
7. Quality check and protection
- Check if the adhesive injected has filled the gap completely.
- Check if the bonding performances meet the requirements after curing.
- Remove all injection nozzles and seal.
- Remove all dirt and rust on the steel plates.
- Apply anti-corrosion treatment to the steel plates.
